Showing posts with label quilt tutorial. Show all posts

Monday, November 11, 2013

Why Remove The Selvage?

I've been asked why I remove my selvage when I prepare my quilt backing?  The reason why I do is because selvage shrinks differently than the fabric and is a much different weight so potentially it will show through on your backing.  When you wash your quilt (I'm a washer - as soon as the quilt is bound I want to wash it) the fabric will shrink a little and when you've left your selvage in your backing material there is a potential to be able to see it.  

Preparing the backing of a quilt seems like it would be a pretty simple task especially if you are sending the quilt off to be long arm quilted.  Most long arm quilters (myself included) are willing to prepare the backing for you but will charge you a minimal fee to do it.  I thought it was a good time to share with you how I go about preparing backing for a quilt.  Here is how I prepare a backing for a twin size quilt.
My first step is to take the fabric and fold it in half length wise, then I cut (actually rip) it in half.  The next step is to refold it right sides together being careful that if it is a directional fabric everything is going in the same direction.  Then off to my sewing machine I go!


I sew rights sides together and I sew a seam that is at least 1"!  I like to sew it a little over an inch and use my sewing machine's sole plate as my guide.


Once I've sewn the pieces together I carefully fold the backing into quarters and then get out my trusty Creative Grids Ruler and my rotary cutter.


For some unknown reason (I'm not certain if someone told me this or not) but I like a full 1//2" seam allowance on my backing.  Like I said I'm not certain exactly why but I do!


Mission accomplished!  The selvage has been removed from the pieced seam and I've left the selvage on the top and the bottom.  This backing is now on it's way to the ironing board so it can get attached to the Long Arm!

Happy Quilting!

Margaret


Saturday, November 9, 2013

Jo Morton - Four Square Quilt

So what do you do when you make too many Four Square Blocks?  You make a table runner!  I'm hoping to have it quilted in time to put it on my table for Thanksgiving Dinner!!


Here's my Jo Morton Four Square Quilt minus the borders.  The fabric pictured is the border fabric.


I tried a new way to make Four Patches!  I love trying new things!

The best part of making four Patches this way is you can do with with ANY size Four Patch, all you need to do is add 3/4" to the size of your block.  So if you want your Four Patch to be 5" cut your squares at 5 3/4".  Here's how I made mine.


The size of my Four Patch is 2.5 so to that I added 3/4" and cut blocks of 3 1/4" square.


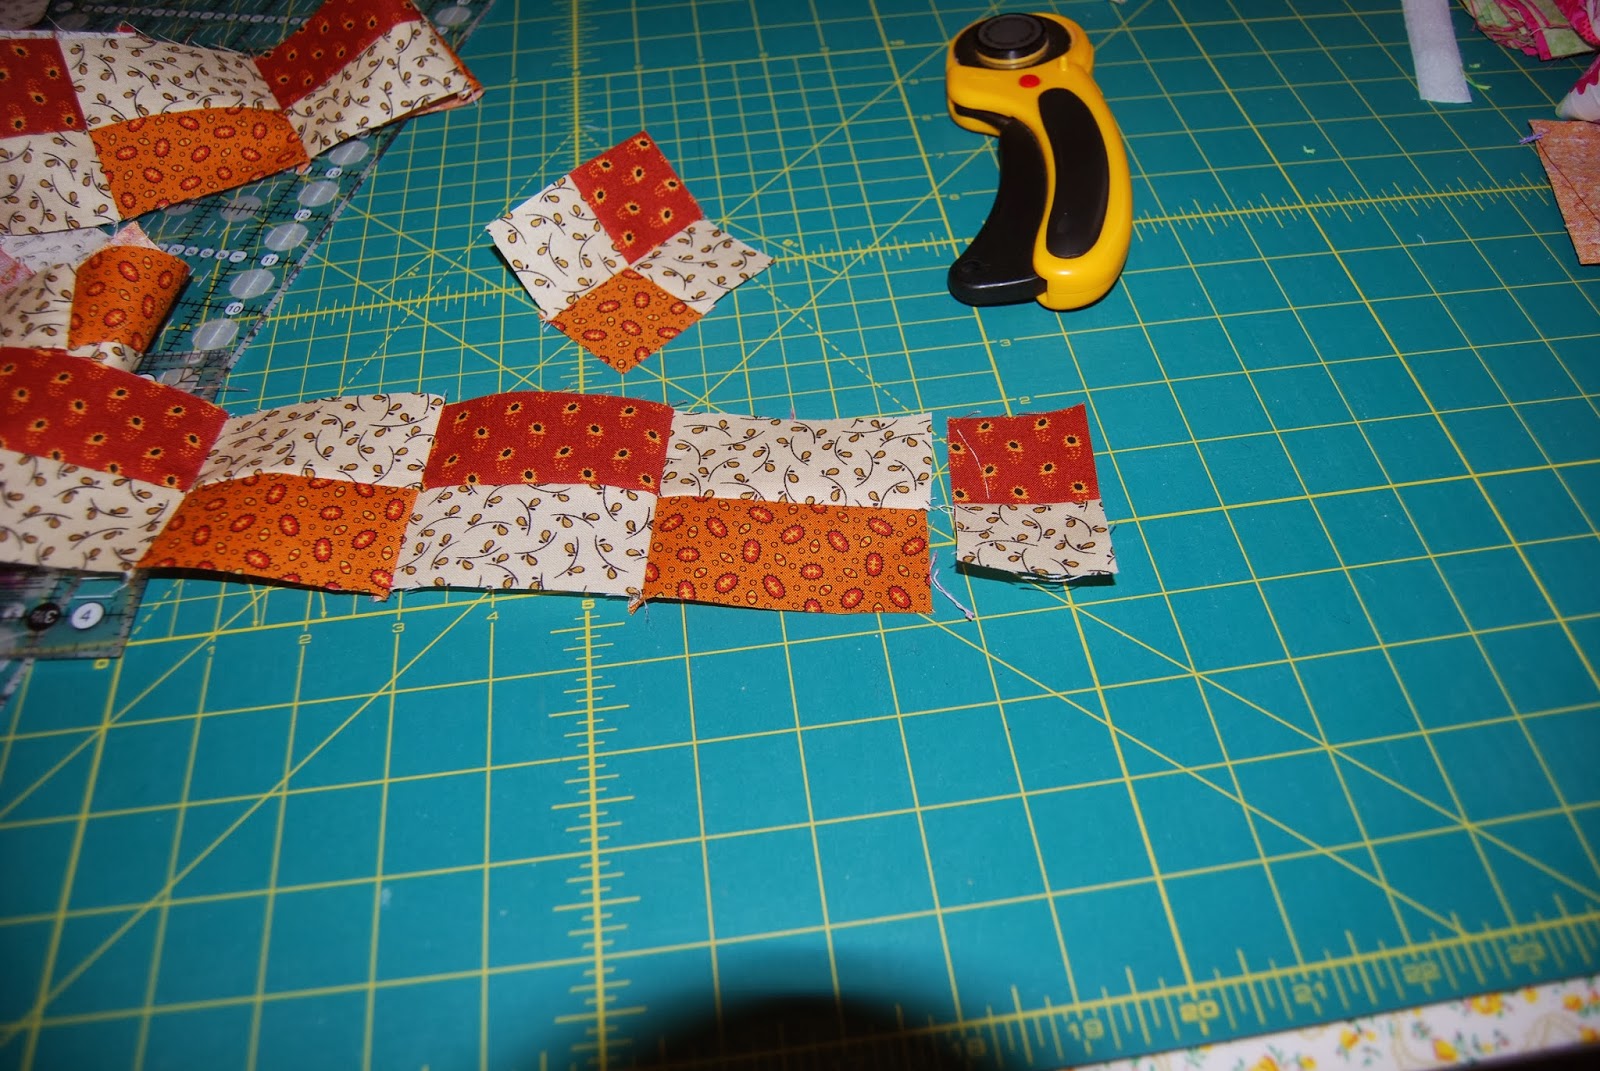
Place right sides together and sew 1/4" seam on two opposite sides.  I chain pieced mine!


Once you have sewn your 1/4" seam on each side you will need to cut these in half.  My 'half' cutting line was 1.625 or 1 5/8".


The next step is to press your seams and sew these pieces together end to end.


Wow do I have a LONG strip!  I should have realized at this point that I had too many!  
Oh well I needed a new table runner!


Your next step is to get your chain cutting going by making your very first cut.  For your first cut, lay your strip on the cutting table and put right sides together, now put your ruler on the wrong side of the piece and cut 1 5/8" off the strip.  


You now have your first Four Patch and another piece that is only have of a Four Patch.  Take the extra piece and attach it to the very end of your strip, this will become your last Four Patch!


Once you've attached it to the end go back to your beginning and start cutting away!  You end up with Four Squares that are ready to be trimmed up!


The thing that I liked the most about this way of making Four Squares is that I wasn't working with 1 1/2" squares!  

Happy Quilting!

Margaret

Sunday, January 6, 2013

Embroidery Envelope Completed!!


I am so excited to be able to share this completed project with everyone!  It feels so wonderful whenever I complete a project!  Crabapple Hill Studio's is one of my favorite designers, I absolutely LOVE her designs, Meg has so much talent and the instructions on her quilt patterns are wonderful!  Here's a few pictures of my completed project::


This is the first time I've made up this pattern so this was my sorta 'test run'.  I made it out of wool felt, used Cosmo floss and Piecemakers needles.  I've been using Cosmo floss now for a couple of years and have to tell you how wonderful it is!  It may cost a little more but it is TOTALLY worth it!  It feels like I'm sewing with silk, very rarely knots and the colors are wonderful!  If you can't find it at your local quilt shop let me know.


Here's the inside completed!  It has a fantastic envelope for my floss, a place to secure my absolute favorite scissors in the entire world, my marking pen, straight pins, sewing needles and my thimble, stick this is my project bag and I'm ready to go!!  I've got a tutorial on how to make a Quick and Easy Project Bag on YouTube as well as a tutorial on how I made this Embroidery Envelope Part 1 & Part 2 & Part 3, check them out if you get a chance!


Happy Quilting!

Friday, January 4, 2013

Crayola Crayons Aren't For JUST Our Children/Grand Children!

I am so excited to have finished this project!  Isn't it the absolute sweetest thing?  With Valentines Day quickly approaching I think this may be the PERFECT little something for Valentines Day or as a Easter Bag/Basket!  This pattern is by Meg Hawkey of Crabapple Hill Studio and is called Crazy Love.  I really enjoy hand work for many reasons but most of all because it is so very easy to travel with.  This project was completed in no time at all, I really was amazed at how quickly it went together.


I'm teaching this project on Sunday February 3rd at O'Susannah's Quilts and Gifts in Watkins Glen NY.  I'll be teaching Meg's Crayola Coloring Technique and the following stitches:

English Daisy
Forget Me Nots
French Knots
Lazy Daisy
Satin Stitch
Circle Flower Rose
Feather Stitch
Fly Stitch
I hope you can attend!  If you can't attend the class but would like to have a on line tutorial please let me know!
Happy Quilting!


Wednesday, November 21, 2012

Quilt in 1 Day!

I designed and completed this entire quilt in 1 day!  I finally got around to completing the video and getting pictures taken today.  Here's the completed quilt:


I can't wait to get this on the Long Arm!  This is going to be so much fun to quilt with all that open space to 'PLAY' with!  I've got some time to decide exactly how I'm going to quilt this, there are a few customer's quilts ahead of this one! 


Here's the video and supply list:


v  1 Jelly Roll

v  4 Yards Fabric (for binding, border and blocks)

v  Background Fabric

o   2 – 52 ½ X 16 ½

o   4 – 34 ½ X 16 ½

o   4 – 26 ½ X 16 ½

o   2 – 18 ½ x 16 ½  


Happy Quilting!


Friday, November 16, 2012

Our Next Quilter In The Family!!!

Every once in a while I put a plain piece of muslin on the Long Arm so I can mess around with new patterns.  Tonight was one of those nights.  Our Granddaughter (Maggie) stopped to see us and show us her beautiful Red Lipstick and Purple Eyeshadow.  As soon as she saw what I was doing she wanted to be a part of the quilting!

 
Maggie sat on my lap for a while while I quilted but then she decided that she needed to do some designs of her own!!  I found a Sharpie and away she went!  Maggie started drawing boxes and then I drew thread designs in the boxes, she thought that was wonderful!
 
 
It wasn't long before I decided the Sharpie wasn't a great idea so I gave her a water soluble marker to play with instead!

 
That was when she decided that the designs needed some additional color added to them! 

 
That paisley pattern was missing something, it isn't any more!


We MAY have our next generation of Long Arm Quilter's in the family!!!
 
Happy Quilting!!

Tuesday, November 13, 2012

Kendra's Quilt!

This is Kendra's very first quilt and it's someones Christmas present!
Don't you wish it was going under the tree for you?


Kendra did a fantastic job making this quilt!

 
All of her sashing strips were STRAIGHT and so were the borders!

 
It was obvious when I quilted it that she measured her quilt in at both ends and in the center to determine the length of her borders!  She did GREAT!

 
The stitch is a tightly stitched all over meander.

 
The thread color is Oasis variegated.

 
I can't believe that this is her first quilt! 

 
This was a really nice quilt to quilt! 


Thank you Kendra for having me quilt this for you!
 
 
Happy Quilting!

Another Quilt Done!

This quilt was so much fun to quilt!  The owner said I could do anything I wanted with this one
so I did!!!
 
There are a total of 13 blocks with the center being appliqued.  Only one of the blocks was repeated (the basket at the top and the bottom) so I figured I needed to quilt EVERY block differently!
 
 
Here we go!!


Basket


Talk about fun!
There were aspects of the quilting patterns that I liked and worked well with this beautiful quilt, but there were also aspects of the quilting patterns that I didn't so I manipulated the patterns to be what I wanted them to be based on the blocks!  I LOVE doing this! It is so much fun to take a quilting pattern and change it so that it 'fits' the beautiful quilt!!!


This block was the simplest that I did, the white with small flowers was a real tight meander and the blocks are a flower that is similar to the flower in the fabric.

 
The quilt is directional so the quilt is also directional,  The heart that you see at the bottom is actually straight up and down.  I think the photographer needs to go back to school :)!!

 
See the design in the black block?  That's a part of another design that I took apart and only used part of it so it would fit in the block!

 
It's a little tough to see but if you take a look at the pattern in the tan and black block, that is actually a part of the block from one of the borders, I took that block, duplicated it and created an entirely new quilt pattern that fit the quilt!!

 
So wish you could see this one better!  The tan and brown blocks are feathers and the other blocks have a beautiful heart with scroll work inside it!

 
See those small white blocks?  In those I found a really simple circle to quilt in these tiny blocks.


See the pattern in the black block?  That's part of the border and is also the block that I duplicated and combined to make another pattern.  The tan and black triangle have a heart pattern with scroll work. 

 
The basket again.

 
My quilting room just isn't big enough to get a picture of the entire quilt!  I'm working on this issue, I need something to hang quilts from so I can take the pictures.  Any suggestions??


I'm off to take more pictures before the customer gets here to pick up her quilt!  Can't wait to show you! 

Happy Quilting!

Wednesday, November 7, 2012

Christmas??

This quilt reminds me so much of Christmas!
 
Paisley's have always been a favorite of mine and this quilt has a couple of different Paisley's in it!
 
I quilted this quilt with Amish Red thread and the pattern is Paisley!!


Please excuse the clash in colors!  The quilt behind it is one of my designs!
I probably shouldn't be pinning quilts to my quilt to take picutres of should I?
I need to figure out someplace to hang quilts for pictures, any suggestions?

 
A not so close up of the blocks!  Don't you love the colors? 


The Paisley Pattern that the entire quilt was quilted in.


I tried to get a good shot of the border, hope you can see it!

 
I promise the border is straight, I had the camera at an angle trying to get a goood shot of the Border!


This was a really nice pattern that matched up easily!


The back!

 
Another of the back!  I always do love the backs of Quilts!!


Time to get another one on the long arm!

Happy Quilting!